


Underground Earth Bag Construction
Episode 11
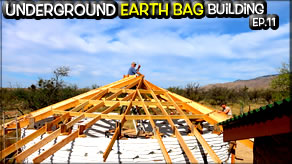
Reciprocal Roof Purlins & Jack Rafters
Filling in the Circular Roofing Frame on the Mus-Art Studio
This week we went to work on the rafters and shored up the wall! Check it out and let us know what you think in the comment section!
Last Episode
http://mylittlehomestead.com/undergound-earth-bag-construction-ep10-reciprocal-roof-frame.html
Next Episode


Shae aka Winter_Apple
October 28, 2016
Transcript of Video
Bree: Last time, we installed the reciprocal roof rafters on the earth bag MusArt Stuido.
Bree: With the rafters placed, it's time to get leveling.
Gary: With about four foot across there.
Garen: From our main one, or what we designate as the main one, actually that is our highest one. So it makes sense to go around and nail off all the rafters so that the roof is level.
Garen: Someone chewed up our line level.
Gary: Does this look familiar? Does that look familiar?
Shelly: So that is your new line level right there?
Garen: Ya. Our new line level. It's top off the line.
Bryson: Top of the line. Haha
Garen: Look at that beauty. It's so big for the hard of seeing. "Hard of seeing". That's the wrong words... seeing impaired? I't bold that way dad can see it.
Gary: You may have remembered we added a couple of poles to secure the wall. Now it's time to be able to attach the wall to the post. For the backside brackets for the wall, we are going to take and cut these 2x3 piece of tubular iron...cut this right in half. We use one half on one side and the other half on the other side.
Garen: Just like that.
Gary: Then run our ready rod right through it tighten it down right the the post.
Bryson: This is the spot in the bag where the rain got it so wet that was oozing out of the bag. And now it's like completely solid. This is where it was kind of mushy, once it set up it turned like a brick man. Gosh...
Shelly: This was a heart shaped sand box we put in for Shae years and years ago. You can see the top has deteriorated. It was plastic painted pink and stuff. We have taken some of the stuff out. You can see how the plastic has deteriorated. But if you watch, I pulled this up, you will see underground...that plastic is in pretty good shape. You can see it is just kind of...and this is ...I don't really know how old this thing is. Whenever you put plastic underground, most people know it does not deteriorate. One of the reasons plastic in our landfill is horrible, but if you just laid plastic in the sun, it would completely deteriorate.
Gary: As part of our finishing up the roof, we get the roof rafters on and fill in between. We start with purlins.
Garen: We are going to take and put the purlins in. And we are going to .... Dad is going to measure those out on the computer and figure out what lengths they need to be. And then we are going to cut all those all in and use them to make sure that all our rafters are setting correctly. So we have it equally divided circle.
Bryson: It's straight.
Gary: it's straight? The purlins will go completely around the structure at the top.
Gary: I guess we have chosen about three rows those purlins. That's our eve right there at 3 feet.
Garen: Can't we just...?
Gary: When you're down here and looking up there, you are seeing this beautiful little...wonderful curve that comes up.
Garen: Our original plan is just having 8 rafters on this. It brings our facia edge too close to the wall. So it is going to look bad. And on the other side, it is even a little closer. So we are probably going to end up with 4 - 6 inches, so we are trying to figure out how to push this out. We decided on going...with just taking...running this level. We are going to just push our facia out like that. So it will give our facia a fun line...a zig-zag kind of look. So we are going to do something kind of fun with the entryway too. It will turn out kind of good I think.
Shelly: Bryson, do you like it?
Bryson: Yea. It looks awesome. I was going to dye it green. I was just going to dye the long part green. But I could not find anything at our local store.
Gary: Oh darn, he couldn't find the green dye.
Shelly: Being annoying? He not annoying.
Bryson: Thank you.
Gary: Between the purlins, we still have to fill in completely all the way up to the peek, so that we can put our sheeting on.
Bryson: Here, I will go show you how they work.
Garen: Sorry Bry.
Bryson: That's ok. There are going to be boards that come down to here. What these do is set up here like this to support the boards that come out.
Gary: We are putting in jack rafters that fill in between the rafters.
Shae: And that helps give it support?
Gary: Ya. Some guy named jack did it. We don't know why. But he named them jack.
Shae: We named the monkey jack.
Gary: We named the monkey jack. Arrrrrg.
Gary: Thirty four. Do you want to do the other ones now?
Garen: Yea.
Gary: I will get this first thirty four for you. Is that inside or out?
Garen: Inside.
Gary: Got it. You know what's really cool is to have Garen up there taking measurements and laying out and doing all that. And just hollering out measurements for me to cut. So, that is awesome. Now he is going to be doing this on his own. It's awesome.
Garen: Over a little more...a quarter of an inch. Whoa. Back...
Bree: Stay tuned next time as we continue closing up the holes in the roof.
Shelly: oh...
Bree: As a side note, our family has been getting into musicals lately, so we have put together a silly little Halloween Special thing that you are welcome to watch. That will be coming out in the next couple days, I don't know today tomorrow...the next day. Before Halloween. It won't take place of a regular Weekly Peek though, it will just kind of be an added bonus for only the bravest people that want to follow us down one of those rabbit holes. We really appreciate you watching though. And have a fantastic Halloween.
All: Thank you.
Bree: I don't know what happened...do I look taller to you? I've grown a few inches. Just saying.
Shelly: Awesome. I like the shoes.
Bree: My bummy shoes.
Shelly: Ya. Don't show that part.
Bree: It doesn't exist. Only this part up here.
Shelly: Diesel please... honey...
Bree: You had all day to be here chewing beans.
Shelly: Max too. He's eating the beans.
Bree: He had to get a little snack. He's is going to sprout like little mesquite beans.
Shae: Our family moved from the city to the country. Thanks for taking part in our adventure. We have new videos every Friday evening. If you would like to help us out, you can like the video, share it, subscribe or support us on Patreon. See the links in the description.
Bryson: So I drew this picture because the marker was going bad. I figured we should get some use out of it before it goes out.

Step by Step - Building of Bry's Earth Bag Room
Full Verion - Building of Bry's Earth Bag Bedroom

Walk Thru Our First Earth Bag Construction Project!

Garen's Earth Bag Interior with Rocket Stove
Garen's Earth Bag Room - the Exterior
Bree's Earth Bag Room
Partners
Resources
www.greenhomebuilding.com/adobe.htm
www.earthbagbuilding.com/articles.htm
www.earthbagplans.wordpress.com
We moved from the city to the country in 2005. Since then, we have been building structures, raising livestock and growing some of our own foods. We are crazy about family, nutrition and want the best for our growing family.
![]()