


Underground Earth Bag Construction
Episode 12
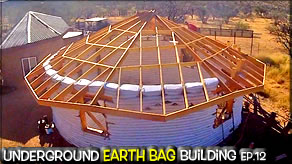
Reciprocal Roof Fascia
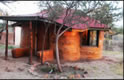
Reciprocal Roof Framing Complete on the Mus-Art Studio!
The Reciprocal Roof Frame is complete now that it has it "face". The family is excited to have the bagging done between the rafters!
Last Episode
Next Episode


Shae aka Winter_Apple
November 11, 2016
Transcript of Video
Bree: The reciprocal roof structure was reinforced last time with purlins and jack rafters on the underground earth bag MusArt studio. The guys begin installing the facia ...you know the face of the roof.
Gary: We need to put up facia and Garen has ingeniously constructed a rafter plumber. It plums the rafters. You move it like that to get the rafters plumb.
Garen: 38 an half. 38 and 3/8's.
Gary: 83 and half.
Garen: That too...
Gary: We built the facia in kinda of a zig zag pattern.
Shelly: It's a zigger zag? Huh Gary?
Gary: Ya. Ya.
Gary: We are using 2x8 material, which is the same width as the the rafters them-self. It was kind of nice to build it that way. I know some folks save money with using smaller materials, but i like to match the tails with the facia material. Weird compound angles all the time. We are done with the facia now and we are moving on to the front section. It is flatter than normal because this come where the shed roof is going to come down to make the front porch.
Shae: The top of the bags and then there is wood that will fit . There is normally a gap between there. And we always have too fill it in with cob. It takes an obnoxious amount of cob.
Bryson: we are filling in between the wood pieces and what we are going to do is flare past that. The closer you can get to the top of this thing, the top of the boards will be better. So, what we do is lay about two bags. That's about the width of these boards and then when we tamp, we tamp it at an angle to match the angle of these bags across this way. Because, when we lay the sheeting down we want the boards to match up to the bag so, we don't get any gaps. The littler the gaps, the better.
Bryson: We're done.
Shae: We are always really happy when we get to this point in the bagging. We are on the last bay section. And then we are like "we're done for good". And then it's just cobbing and roofs. Yup!
Bree: This is victory my brother. It's victory. We have won the battle but yet the war.
Shelly: The kids think they are done bagging. But have just a little bit more to do. But, they are feeling good about life so i'm not going to say anything.
Bryson: I have decided to play around with the drone and see if i can't get it flying again. I 3D printed this thing. It is designed to take the "jiggle" out of the ... actually i didn't make this .. i printed it but it was designed by someone else. So, we decided to strap the GoPro to it and tak it into the air and try to get some footage. Hopefully it does' the land in water or go into a place it shouldn't go.
Shelly: You know what? There is no danger that it will go into any water around here.
Bryson: You know i don't think there is. It was just like...oh my gosh...it was so wobbly. I was forcing it this way and that way. It wanted to go all over the place, wobbling in the air. So, you have this really, really wobbly footage. We were able to capture a still from it. That's pretty cool. I try to keep working with it and see if i can't get it to fly properly again. I don't know if it will ever work the same way again.
Gary: We first found this whole idea of the reciprocal roofs from doing a little bit of research on the internet. I found this PDF on reciprocal roofs by a gentleman that is a designer and engineer that is in Japan. There was a lady named Olga Popvic. She had done a great little review of that particular process and how it was done. The name of it is called "Reciprocal Frame Architecture in Japan". Check it out on Google. After reading it, we of course wanted to get the idea. I was very confident that this was a good process. We wanted to go forward with it. I just started cutting roof and designing it like it was done in Japan. The idea too is that we have two compression rings. One at the top and a compression ring at the bottom. It is very similar to a Yurt or Tee Pee even for that matter. You have a compression ring at the top where you rope around the tee pee poles. I'm very happy with the results. I have been building roofs a long time. It fits the circle just perfect.
Garen: We are putting on the porch section. We had to bring these up just a little bit so we wouldn't bump our heads on it. The indent is so we can raise the ceiling up or otherwise it's down here and then we are six inches below our door. And we don't want that. Instead of doing a "Layon", we can come right out from the eve. And this is going straight out from there. it is pretty easy. Not too complex. That's it.
Gary: We put in some temporary post. It that six foot seven? Do you know that is a regular door height? We will be putting in some permanent post as soon as we trim out a tree.
Garen: it is pretty straight from there to there. And up in there.
Bryson: I can see my room from here. Ok. I'm getting down. It is a little scary up here.
Bree: That wraps up this weeks Weekly Peek. Stay tuned next time when continue more progress earth bag MusArt Studio. In the meantime, we will see you next time.
All: Thank you.
Shae: I don't know if you know this or not, but we have a Patreon Account so it you just want to...It really helps...Hello Diesel...It will help us out. No No, I don't talk to you right now.
Shae: Our family moved from the city to the country. Thanks for taking part in our adventure. We have new videos every Friday evening. If you would like to help us out, you can like the video, share it, subscribe or support us on Patreon. See the links in the description.
Gary: Take part...Could you make more noise while I talk?.....
It's Christmas time here fairly soon, so we have a lot of mistletoe in the trees. Shelly and I are going out and trim the tree and trim out one of the tree branches. "Smootch...Smootch..." We are going to be trimming out one of the trees. Isn't that funny, it is Christmas. Mistletoe....It's all suppose to be funny...

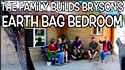
Step by Step - Building of Bry's Earth Bag Room
Full Verion - Building of Bry's Earth Bag Bedroom
Walk Thru Our First Earth Bag Construction Project!

Garen's Earth Bag Interior with Rocket Stove
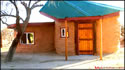
Garen's Earth Bag Room - the Exterior
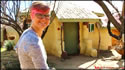
Bree's Earth Bag Room
Partners
Resources
www.greenhomebuilding.com/adobe.htm
www.earthbagbuilding.com/articles.htm
www.earthbagplans.wordpress.com
We moved from the city to the country in 2005. Since then, we have been building structures, raising livestock and growing some of our own foods. We are crazy about family, nutrition and want the best for our growing family.
![]()